![]()
INVENTORY
The Inventory icon is where you can control where Phone Numbers are routed for voice calls. This is also where you can configure devices to user’s accounts and set up Emergency endpoints for e911. Clicking the Inventory icon will take you to the Inventory Phone Numbers tab.
Inventory: Managing Numbers, Devices, and Emergency Routing
The Inventory section is your central hub for managing phone numbers, configuring devices, and setting up emergency endpoints (e911). To access it, click the Inventory icon in the top navigation bar. This will take you to the Phone Numbers tab by default.
Phone Numbers
In this section, you’ll find a list of all phone numbers assigned to your organization. Each number displays:
Treatment/Application: How the number is used (e.g., direct line, auto attendant)
Destination: Where the call is routed
Notes: Helpful identifiers or context for usage
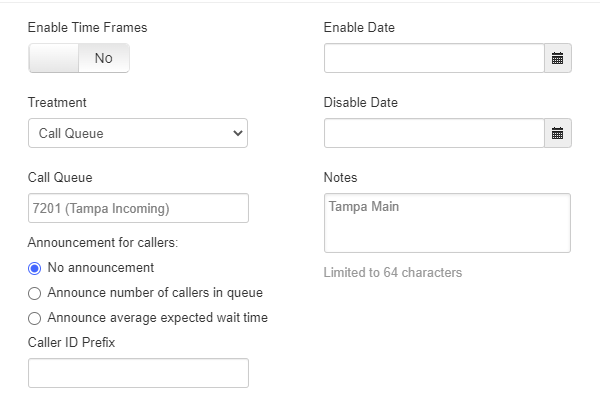
Clicking on any number will open its configuration panel, where you can:
Change the routing destination
Add an announcement to play when the number is called
Set a Caller ID prefix
Configure delayed start/stop times (if needed)
Tip: Add clear, descriptive notes when assigning numbers, it makes future updates significantly easier.
Phone Builder (Device Management)
Switch to the Phone Hardware tab to view all devices registered to your organization. Each device shows a green or red status indicator to display whether it’s currently registered.

To add a device:
1. Click Add Phone
2. Enter the following details:
- Model
- MAC Address
- Assigned Extension(s)
3. Go to the Advanced tab to assign a directory (for BLF keys, if supported).
4. Click Save to add the device to your inventory.

Editing Devices and Layouts
You can edit device settings in two ways:
- Click Edit next to the extension to adjust basic device settings.
- Click the gear icon or open Phone Builder to customize layouts or apply templates.
This allows you to configure button layouts, speed dials, BLF keys, and more.
Using Templates
Click the Templates button (top-right corner) to open the Template Manager. From here, you can:
View available templates
Apply a template to one or more devices
Standardize button layouts across your organization

Important: If you make changes to a template, you must re-apply it to each device for the updates to take effect. The configuration file in the manager portal should always match what’s currently on the phone.
Was this article helpful?
That’s Great!
Thank you for your feedback
Sorry! We couldn't be helpful
Thank you for your feedback
Feedback sent
We appreciate your effort and will try to fix the article